
Full Send vs the Blitz Slider
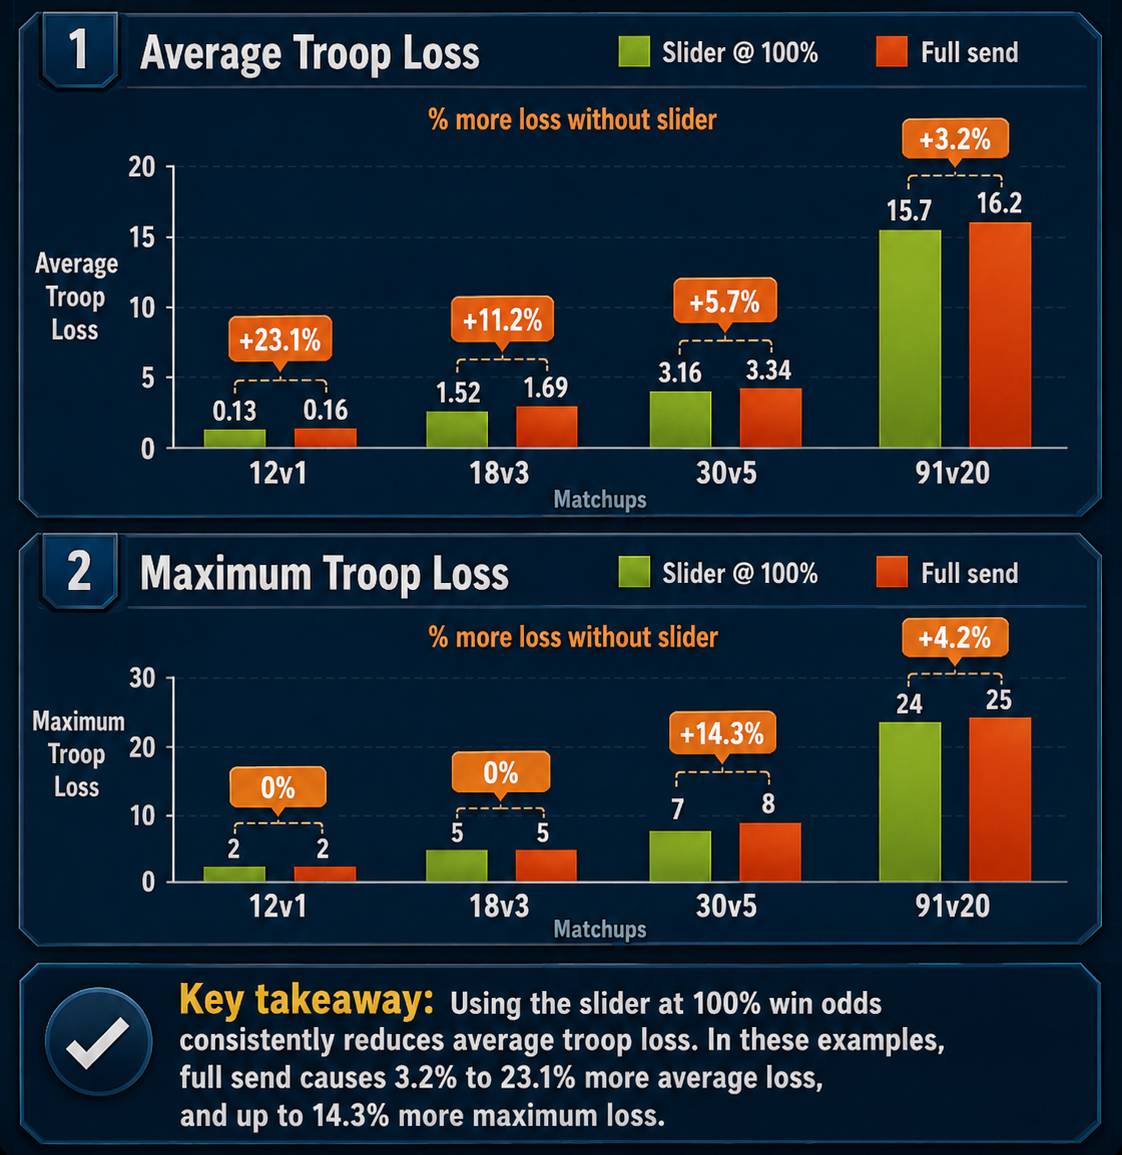
The in-game blitz slider lets you commit exactly the minimum needed for a 100% win — full-sending a bigger stack still always wins, but it costs a little more: Balanced Blitz trims and reshapes outcomes relative to your whole committed force, so a bigger force lets slightly worse results survive. This table shows the exact price of overshooting, for common defender stacks, at steps from the 100% minimum up to 5x of it. All numbers are exact Balanced Blitz probabilities — nothing is simulated.
| Attack | Overshoot | Min loss | Avg. loss | Max loss | Extra avg. loss vs 100% blitz |
|---|---|---|---|---|---|
| Defending stack: 1 · 100% blitz = 4v1 | |||||
| 4v1 | 1x | 0 | 0.13 | 2 | baseline |
| 5v1 | 1.25x | 0 | 0.15 | 1 | +0.02 (+14.5%) |
| 6v1 | 1.5x | 0 | 0.16 | 2 | +0.03 (+23.6%) |
| 8v1 | 2x | 0 | 0.16 | 2 | +0.03 (+25.1%) |
| 10v1 | 2.5x | 0 | 0.16 | 2 | +0.03 (+25.3%) |
| 12v1 | 3x | 0 | 0.16 | 2 | +0.03 (+25.4%) |
| 14v1 | 3.5x | 0 | 0.16 | 2 | +0.03 (+25.4%) |
| 16v1 | 4x | 0 | 0.16 | 2 | +0.03 (+25.4%) |
| 18v1 | 4.5x | 0 | 0.16 | 2 | +0.03 (+25.4%) |
| 20v1 | 5x | 0 | 0.16 | 2 | +0.03 (+25.4%) |
| Defending stack: 2 · 100% blitz = 6v2 | |||||
| 6v2 | 1x | 0 | 0.86 | 3 | baseline |
| 8v2 | 1.25x | 0 | 0.89 | 4 | +0.04 (+4.4%) |
| 9v2 | 1.5x | 0 | 0.90 | 4 | +0.05 (+5.5%) |
| 12v2 | 2x | 0 | 0.93 | 4 | +0.07 (+8.1%) |
| 15v2 | 2.5x | 0 | 0.93 | 4 | +0.07 (+8.6%) |
| 18v2 | 3x | 0 | 0.93 | 4 | +0.07 (+8.6%) |
| 21v2 | 3.5x | 0 | 0.93 | 4 | +0.07 (+8.7%) |
| 24v2 | 4x | 0 | 0.93 | 4 | +0.07 (+8.7%) |
| 27v2 | 4.5x | 0 | 0.93 | 4 | +0.07 (+8.7%) |
| 30v2 | 5x | 0 | 0.93 | 4 | +0.07 (+8.7%) |
| Defending stack: 3 · 100% blitz = 7v3 | |||||
| 7v3 | 1x | 0 | 1.52 | 5 | baseline |
| 9v3 | 1.25x | 0 | 1.60 | 5 | +0.08 (+5.4%) |
| 11v3 | 1.5x | 0 | 1.63 | 5 | +0.11 (+7.2%) |
| 14v3 | 2x | 0 | 1.67 | 5 | +0.15 (+10.1%) |
| 18v3 | 2.5x | 0 | 1.69 | 5 | +0.17 (+10.9%) |
| 21v3 | 3x | 0 | 1.69 | 5 | +0.17 (+10.9%) |
| 25v3 | 3.5x | 0 | 1.69 | 5 | +0.17 (+11.0%) |
| 28v3 | 4x | 0 | 1.69 | 5 | +0.17 (+11.0%) |
| 32v3 | 4.5x | 0 | 1.69 | 5 | +0.17 (+11.0%) |
| 35v3 | 5x | 0 | 1.69 | 5 | +0.17 (+11.0%) |
| Defending stack: 4 · 100% blitz = 9v4 | |||||
| 9v4 | 1x | 0 | 2.44 | 6 | baseline |
| 11v4 | 1.25x | 0 | 2.46 | 6 | +0.02 (+0.7%) |
| 14v4 | 1.5x | 0 | 2.57 | 7 | +0.12 (+5.1%) |
| 18v4 | 2x | 0 | 2.58 | 7 | +0.14 (+5.6%) |
| 23v4 | 2.5x | 0 | 2.58 | 7 | +0.14 (+5.7%) |
| 27v4 | 3x | 0 | 2.58 | 7 | +0.14 (+5.7%) |
| 32v4 | 3.5x | 0 | 2.58 | 7 | +0.14 (+5.7%) |
| 36v4 | 4x | 0 | 2.58 | 7 | +0.14 (+5.7%) |
| 41v4 | 4.5x | 0 | 2.58 | 7 | +0.14 (+5.7%) |
| 45v4 | 5x | 0 | 2.58 | 7 | +0.14 (+5.7%) |
| Defending stack: 5 · 100% blitz = 10v5 | |||||
| 10v5 | 1x | 1 | 3.16 | 7 | baseline |
| 13v5 | 1.25x | 1 | 3.25 | 7 | +0.09 (+2.8%) |
| 15v5 | 1.5x | 1 | 3.30 | 8 | +0.13 (+4.3%) |
| 20v5 | 2x | 1 | 3.34 | 8 | +0.18 (+5.6%) |
| 25v5 | 2.5x | 1 | 3.34 | 8 | +0.18 (+5.7%) |
| 30v5 | 3x | 1 | 3.34 | 8 | +0.18 (+5.7%) |
| 35v5 | 3.5x | 1 | 3.34 | 8 | +0.18 (+5.7%) |
| 40v5 | 4x | 1 | 3.34 | 8 | +0.18 (+5.7%) |
| 45v5 | 4.5x | 1 | 3.34 | 8 | +0.18 (+5.7%) |
| 50v5 | 5x | 1 | 3.34 | 8 | +0.18 (+5.7%) |
| Defending stack: 6 · 100% blitz = 11v6 | |||||
| 11v6 | 1x | 1 | 4.0 | 9 | baseline |
| 14v6 | 1.25x | 1 | 4.1 | 9 | +0.1 (+2.4%) |
| 17v6 | 1.5x | 1 | 4.2 | 9 | +0.2 (+4.3%) |
| 22v6 | 2x | 1 | 4.3 | 9 | +0.2 (+5.6%) |
| 28v6 | 2.5x | 1 | 4.3 | 9 | +0.2 (+5.7%) |
| 33v6 | 3x | 1 | 4.3 | 9 | +0.2 (+5.7%) |
| 39v6 | 3.5x | 1 | 4.3 | 9 | +0.2 (+5.7%) |
| 44v6 | 4x | 1 | 4.3 | 9 | +0.2 (+5.7%) |
| 50v6 | 4.5x | 1 | 4.3 | 9 | +0.2 (+5.7%) |
| 55v6 | 5x | 1 | 4.3 | 9 | +0.2 (+5.7%) |
| Defending stack: 10 · 100% blitz = 16v10 | |||||
| 16v10 | 1x | 3 | 7.4 | 13 | baseline |
| 20v10 | 1.25x | 3 | 7.5 | 13 | +0.1 (+1.4%) |
| 24v10 | 1.5x | 3 | 7.6 | 14 | +0.2 (+2.8%) |
| 32v10 | 2x | 3 | 7.6 | 14 | +0.2 (+3.4%) |
| 40v10 | 2.5x | 3 | 7.6 | 14 | +0.2 (+3.4%) |
| 48v10 | 3x | 3 | 7.6 | 14 | +0.2 (+3.4%) |
| 56v10 | 3.5x | 3 | 7.6 | 14 | +0.2 (+3.4%) |
| 64v10 | 4x | 3 | 7.6 | 14 | +0.2 (+3.4%) |
| 72v10 | 4.5x | 3 | 7.6 | 14 | +0.2 (+3.4%) |
| 80v10 | 5x | 3 | 7.6 | 14 | +0.2 (+3.4%) |
| Defending stack: 20 · 100% blitz = 26v20 | |||||
| 26v20 | 1x | 9 | 15.7 | 24 | baseline |
| 33v20 | 1.25x | 9 | 16.0 | 24 | +0.2 (+1.5%) |
| 39v20 | 1.5x | 9 | 16.1 | 25 | +0.4 (+2.4%) |
| 52v20 | 2x | 9 | 16.2 | 25 | +0.4 (+2.6%) |
| 65v20 | 2.5x | 9 | 16.2 | 25 | +0.4 (+2.6%) |
| 78v20 | 3x | 9 | 16.2 | 25 | +0.4 (+2.6%) |
| 91v20 | 3.5x | 9 | 16.2 | 25 | +0.4 (+2.6%) |
| 104v20 | 4x | 9 | 16.2 | 25 | +0.4 (+2.6%) |
| 117v20 | 4.5x | 9 | 16.2 | 25 | +0.4 (+2.6%) |
| 130v20 | 5x | 9 | 16.2 | 25 | +0.4 (+2.6%) |
| Defending stack: 50 · 100% blitz = 56v50 | |||||
| 56v50 | 1x | 30 | 41.1 | 53 | baseline |
| 70v50 | 1.25x | 30 | 41.6 | 55 | +0.5 (+1.2%) |
| 84v50 | 1.5x | 30 | 41.7 | 56 | +0.6 (+1.6%) |
| 112v50 | 2x | 30 | 41.7 | 56 | +0.6 (+1.6%) |
| 140v50 | 2.5x | 30 | 41.7 | 56 | +0.6 (+1.6%) |
| 168v50 | 3x | 30 | 41.7 | 56 | +0.6 (+1.6%) |
| 196v50 | 3.5x | 30 | 41.7 | 56 | +0.6 (+1.6%) |
| 224v50 | 4x | 30 | 41.7 | 56 | +0.6 (+1.6%) |
| 252v50 | 4.5x | 30 | 41.7 | 56 | +0.6 (+1.6%) |
| 280v50 | 5x | 30 | 41.7 | 56 | +0.6 (+1.6%) |
| Defending stack: 100 · 100% blitz = 103v100 | |||||
| 103v100 | 1x | 67 | 83.5 | 100 | baseline |
| 129v100 | 1.25x | 67 | 84.4 | 104 | +0.9 (+1.0%) |
| 155v100 | 1.5x | 67 | 84.4 | 104 | +0.9 (+1.1%) |
| 206v100 | 2x | 67 | 84.4 | 104 | +0.9 (+1.1%) |
| 258v100 | 2.5x | 67 | 84.4 | 104 | +0.9 (+1.1%) |
| 309v100 | 3x | 67 | 84.4 | 104 | +0.9 (+1.1%) |
| 361v100 | 3.5x | 67 | 84.4 | 104 | +0.9 (+1.1%) |
| 412v100 | 4x | 67 | 84.4 | 104 | +0.9 (+1.1%) |
| 464v100 | 4.5x | 67 | 84.4 | 104 | +0.9 (+1.1%) |
| 515v100 | 5x | 67 | 84.4 | 104 | +0.9 (+1.1%) |
| Defending stack: 200 · 100% blitz = 194v200 | |||||
| 194v200 | 1x | 144 | 168.4 | 192 | baseline |
| 243v200 | 1.25x | 145 | 169.7 | 197 | +1.3 (+0.7%) |
| 291v200 | 1.5x | 145 | 169.7 | 197 | +1.3 (+0.8%) |
| 388v200 | 2x | 145 | 169.7 | 197 | +1.3 (+0.8%) |
| 485v200 | 2.5x | 145 | 169.7 | 197 | +1.3 (+0.8%) |
| 582v200 | 3x | 145 | 169.7 | 197 | +1.3 (+0.8%) |
| 679v200 | 3.5x | 145 | 169.7 | 197 | +1.3 (+0.8%) |
| 776v200 | 4x | 145 | 169.7 | 197 | +1.3 (+0.8%) |
| 873v200 | 4.5x | 145 | 169.7 | 197 | +1.3 (+0.8%) |
| 970v200 | 5x | 145 | 169.7 | 197 | +1.3 (+0.8%) |
The penalty flattens out quickly: most of it is already there at 1.5x, and a 3x overkill costs barely more than 2x — so a lazy full send is a small fixed tax, not a scaling one. The exception to care about is the max loss column: a red number means overshooting has raised your worst case above what the 100% blitz risks.
Why does the max loss jump around? (4v1 = 2, 5v1 = 1, 6v1 = 2)
Not randomness — these are exact probabilities, and the wobble is a real Balanced Blitz mechanic. After sharpening the win odds, the algorithm lines every outcome up from best to worst and deletes the worst outcomes one by one until exactly 10 percentage points of probability have been removed (the same happens at the lucky end). Wherever that deletion stops mid-outcome, the outcome keeps only the part above the 10% line — and that leftover sliver is your max loss.
For 4v1 the outcomes worse than "lose 1" (the defeat plus "lose 2") hold 10.5% between them: the deletion swallows the defeat whole (that is exactly why 4v1 is a guaranteed win) and stops just inside "lose 2", leaving it a 0.5% sliver. For 5v1 that same tail holds only 9.0% — under the line, so the whole tail is deleted and the max drops to 1. For 6v1 a bigger committed force widens the outcome range and the tail grows back to 10.7%, so a 0.7% sliver of "lose 2" pokes out again.
So no, it is not "14.3% minus 10%": the deletion covers an area of the worst outcomes, and what survives is only the part of the last outcome sticking out above the line. A final step then boosts likely outcomes at the expense of unlikely ones, which squashes those 0.5–0.7% slivers down to the 0.02–0.03% you would see in the calculator. The max loss column is exact, but some worst cases are one-in-thousands events.
Related tools: the Blitz 100% chart for the minimum stack against any defender up to 300, and the Blitz Calculator for the full outcome distribution of any battle.